Link2SD guide –never worry about internal memory limits again


One of the most common gripes we hear from Sony Ericsson Xperia owners is that it doesn’t take too long before you fill up the phone’s internal memory. Whilst most of the 2011 Xperia range has a 1GB ROM, only around 380MB can be used for apps or games. Obviously manually moving your apps to the SD card is one answer to this problem, but this can be a pain to manage and sometimes part of the app will remain in internal memory.
To get round this problem, we’ve written the following guide on Link2SD. In layman terms, Link2SD uses a secondary partition on your SD card and uses it as another segment of internal memory. Link2SD moves and links apk files, dalvik-cache (.dex) files and lib files onto this partition, which the OS mounts on boot. The great thing is that these linked apps remain available when your phone is connected in mass storage mode as Android only unmounts the first partition. Also, you don’t need to worry about linking something you weren’t meant to as Link2SD doesn’t allow you to link certain system applications.
Link2SD allows you to cherry-pick which apps/games to move to the SD card, you can auto-link new installs and the whole thing is wrapped in a user-friendly user interface. We’ve been using Link2SD for a while now and it’s a godsend, especially for the Xperia PLAY where we tend to download a lot of games. If you’re constantly managing your internal memory we highly recommend you give Link2SD a try, see the full guide below.
1. PREPARATION
Please make sure you have completed all of the following before starting the tutorial.
On your PC:
– Install the necessary drivers for your Xperia smartphone onto your PC/laptop. The easiest way to do this is to ensure that Sony Ericsson PC Companion is installed on your PC. Once installed, connect your phone to complete the process.
– Download and install MiniTool Partition Wizard onto your PC or laptop.
On your Xperia:
– Enable USB de-bugging mode: Setting –> Applications –> Development –> Tick ‘USB debugging’
– Enable the ability to install unknown apps: Setting –> Applications –> Tick ‘Unknown sources’
– Install Link2SD from Android Market onto your Xperia smartphone. It is a free download.
2. ROOT
Rooting your handset gives you the permissions necessary to install custom software on your handset.
a) First, download the ‘Xperia 2011 Easy Rooting Toolkit’ from here.
b) Extract the RAR file using WinRAR or 7-Zip.
c) Connect your Xperia to your PC.
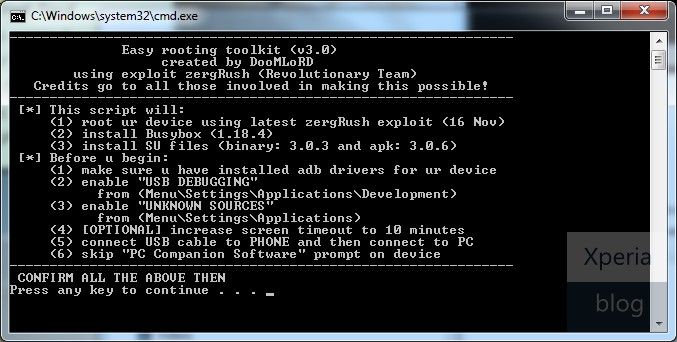
d) Click on ‘RUNME.bat’ from the extracted RAR file, which should give you the following screen. Just press any button to let the program do its work.
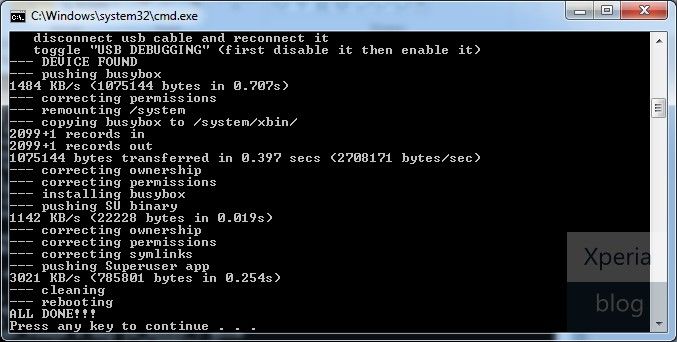
e) When finished you should see the output as per the picture below. The phone should now be rooted, make sure you restart your handset before the next step.
3. BACKUP MEMORY CARD
As we will be creating a partition on your microSD memory card, make sure you create a backup just in case anything goes wrong.
a) Create a new folder on your PC and name it anything you want, such as ‘SD_Backup’
b) Connect your phone to the PC, navigate to your memory card and copy the contents to the backup folder.
4. CREATE SECONDARY PARTITION
You now need to create a secondary partition on your microSD memory card that will enable you to use Link2SD.
Note: We will use MiniTool Partition Wizard to create a secondary partition on your microSD card. This partition can be ext2, ext3, ext4 or FAT32. We will use FAT32 as it is supported on all phones and should lead to less troubleshooting later. You can use any partition manager of your choosing, but the steps below guide you through MiniTool Partition Wizard.
There is no need to wipe your memory card when going through this process, just ensure you have at least 0.5GB to 1.0GB of free space to make it worthwhile. You also do not need to use a microSD card adaptor as the process below creates the partition whilst the phone is connected to your PC.
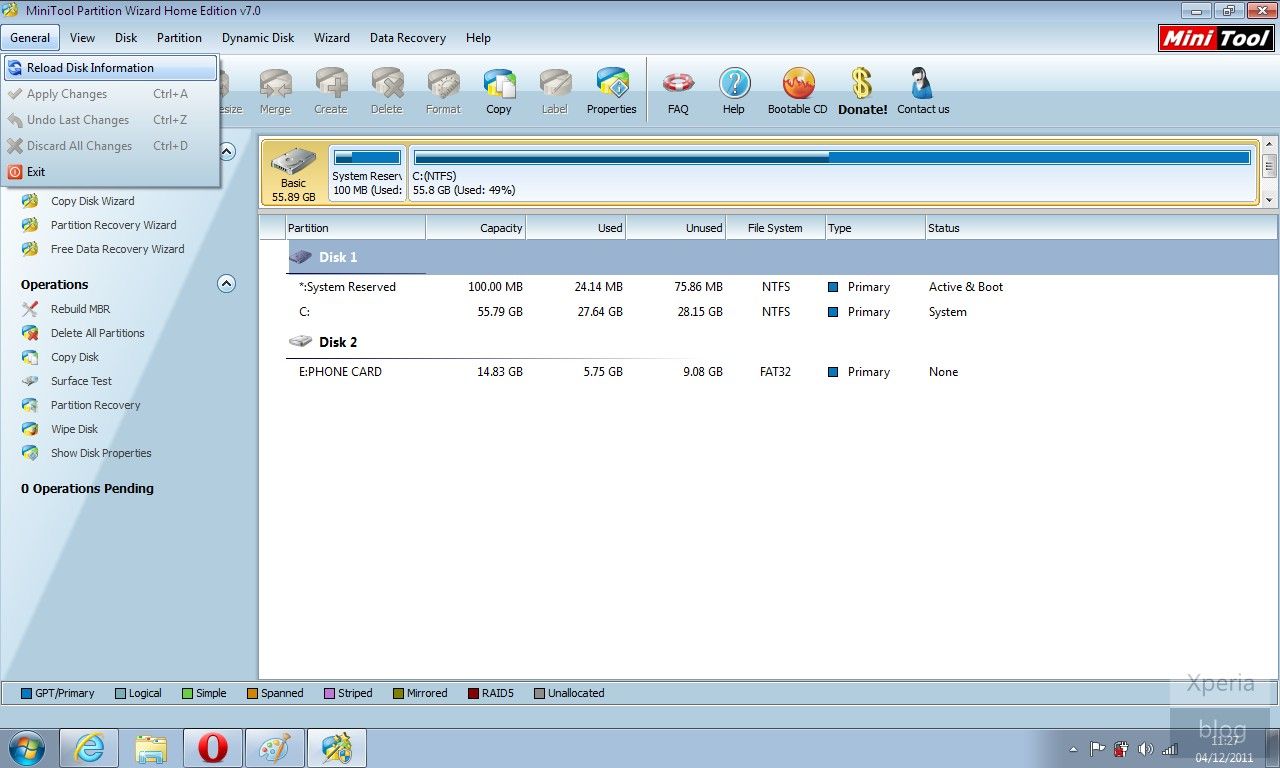
a) Connect your handset to the PC via USB and then launch MiniTool. You should see the details pop up under ‘Disk 2′.
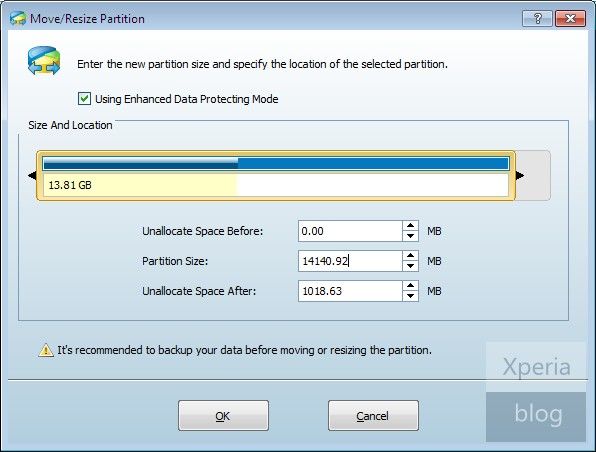
b) Click on the memory card under Disk 2 in MiniTool and then in the left pane, press ‘Move/Resize Partition’. On the blue bar under ‘Size and Location’, move the right arrow towards the left to create the size of the secondary partition desired. In the example below we created a secondary partition with 1018.63MB of space. This value can also be typed in manually in ‘Unallocate Space After’.
c) Once this is done you should see that your memory card is now split into two partitions under Disk 2 of MiniTool. Right click this new partition and then press ‘Create’.
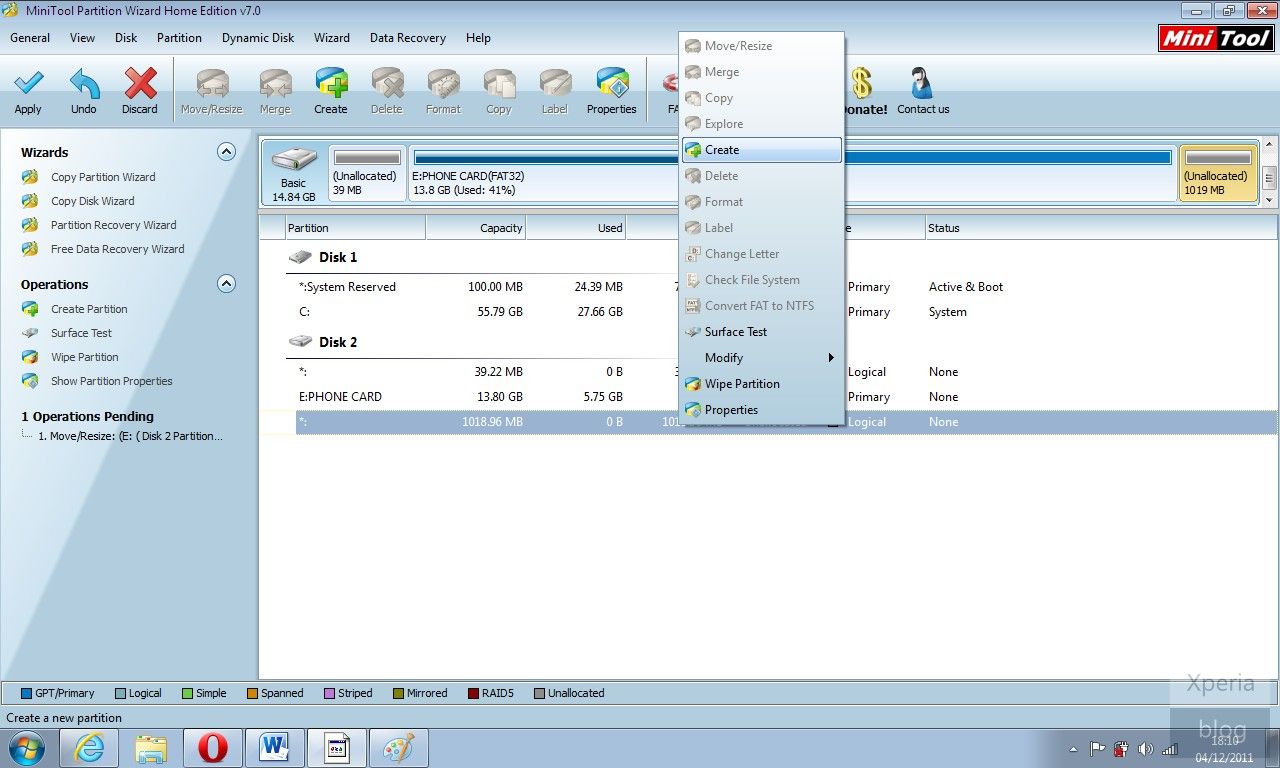
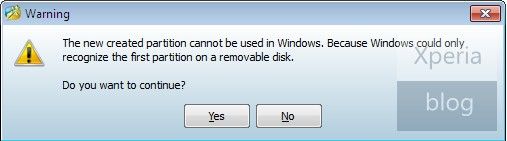
If you see this pop-up below, just press ‘Yes’ to continue.
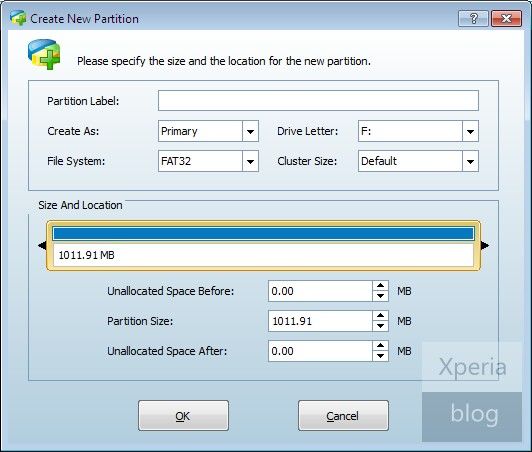
d) You should then see this ‘Create New Partition’ window. Under ‘Create As’ click Primary and then under ‘File System’ click FAT32. Leave the cluster size as default and you can assign whichever drive letter you want. Once finished press OK.
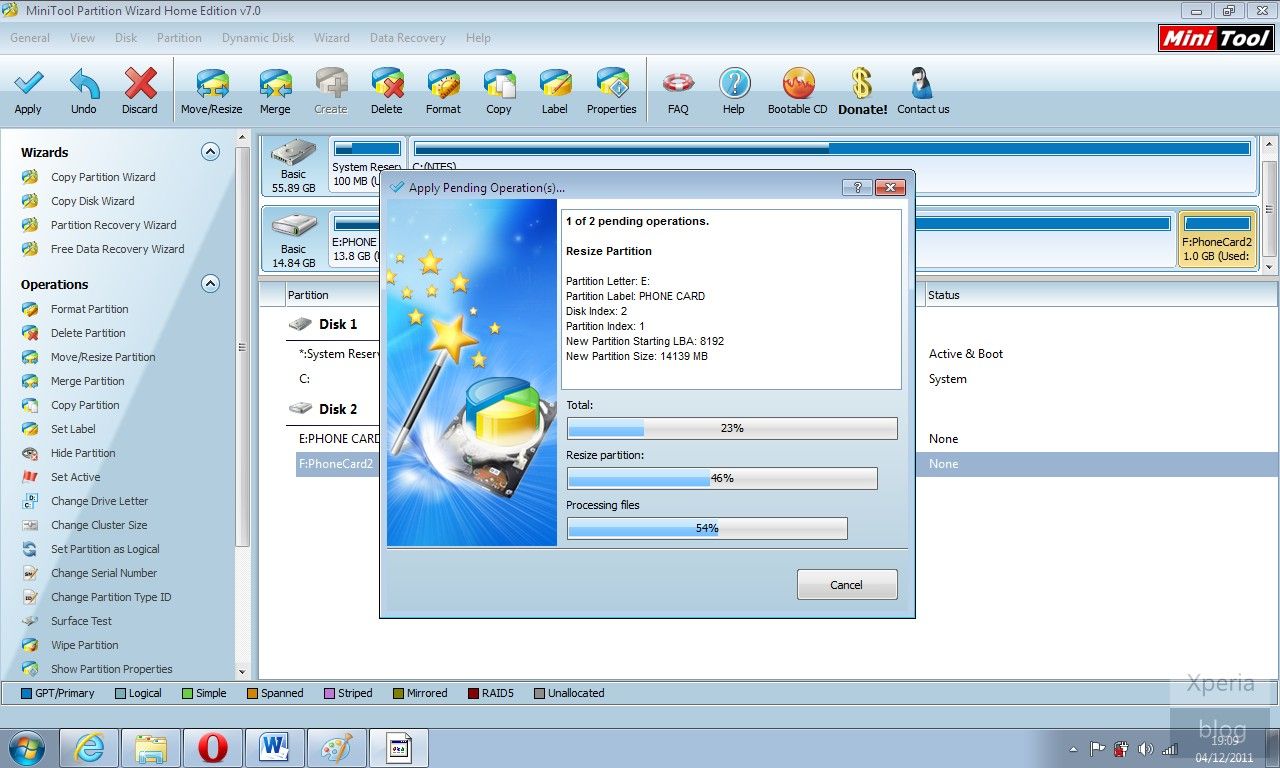
e) This should bring you back to the main MiniTool screen. Now hit the ‘Apply’ button on the top-left of the screen, denoted by a tick symbol.
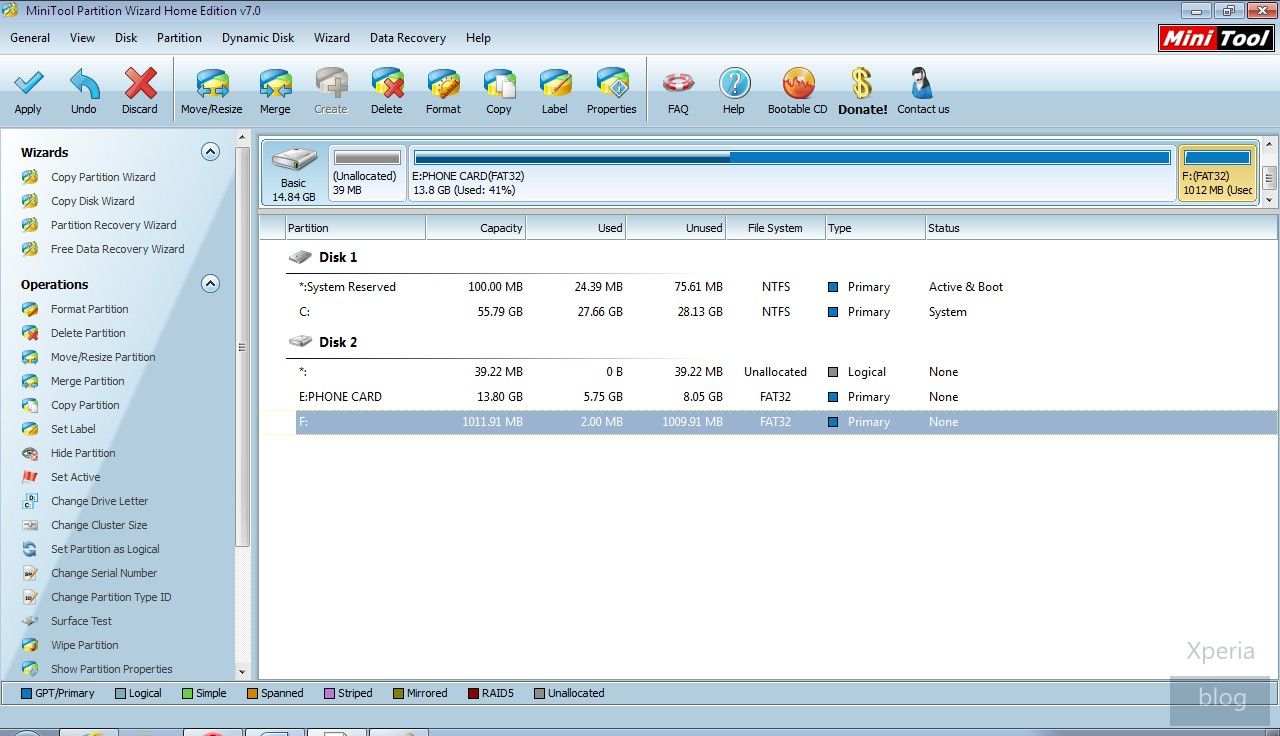
This will bring up another pop-up window and will take several minutes to both resize and create the secondary partition.
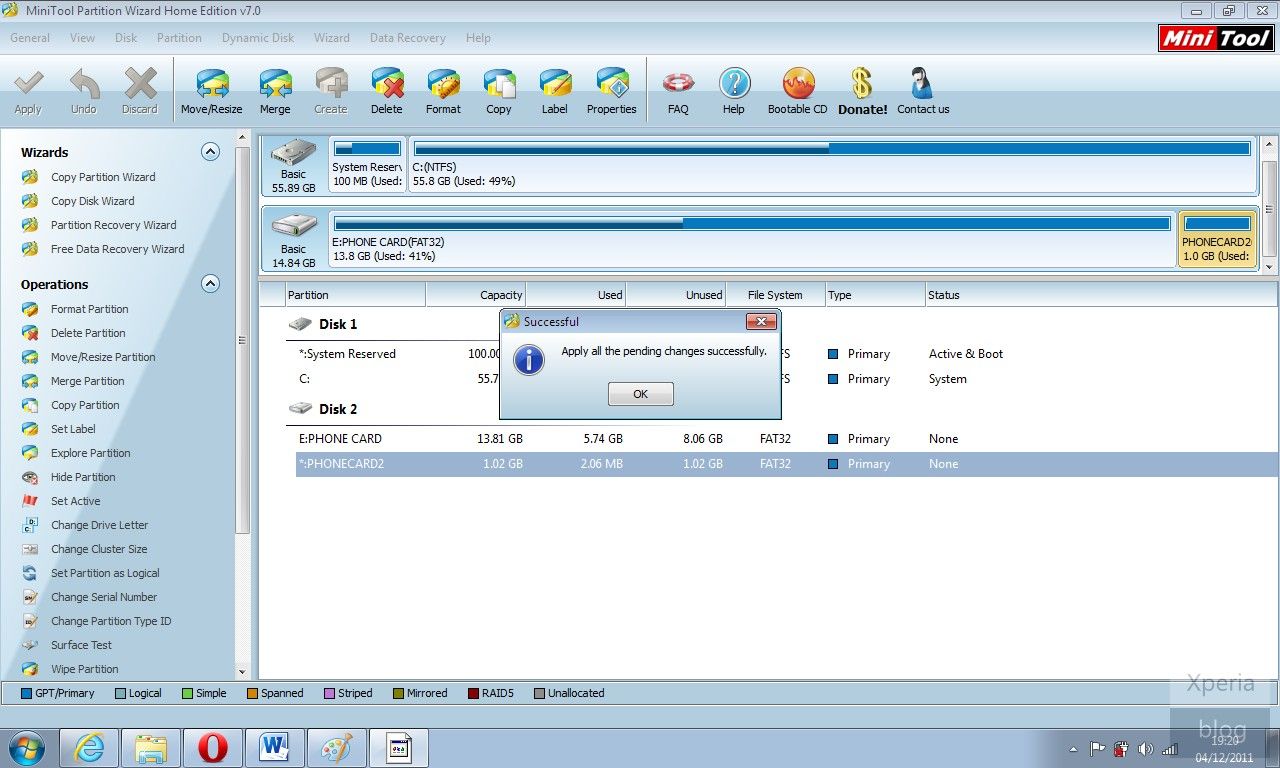
If successful, you should see message below. Congratulations your card is ready to use in conjunction with Link2SD. Restart your handset before moving to the next step.
5. LINK2SD
This application makes it easy for users with root privileges on their phone to move applications to the SD card.
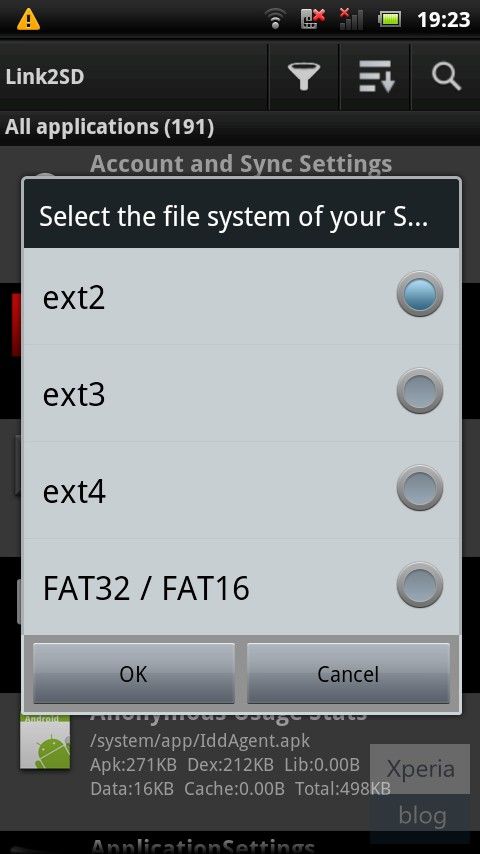
a) Open the Link2SD app on your phone. You should be greeted with the following menu, check the FAT32 option and click OK.
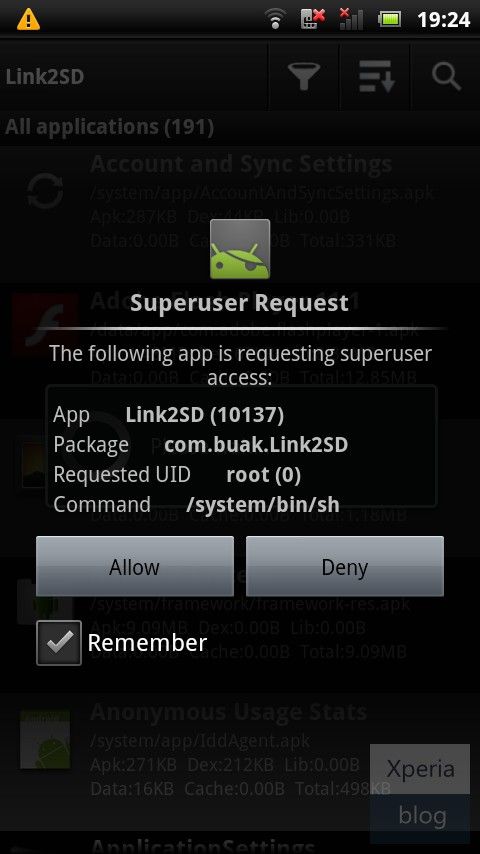
You will then see the Superuser Request, click ‘Allow’.
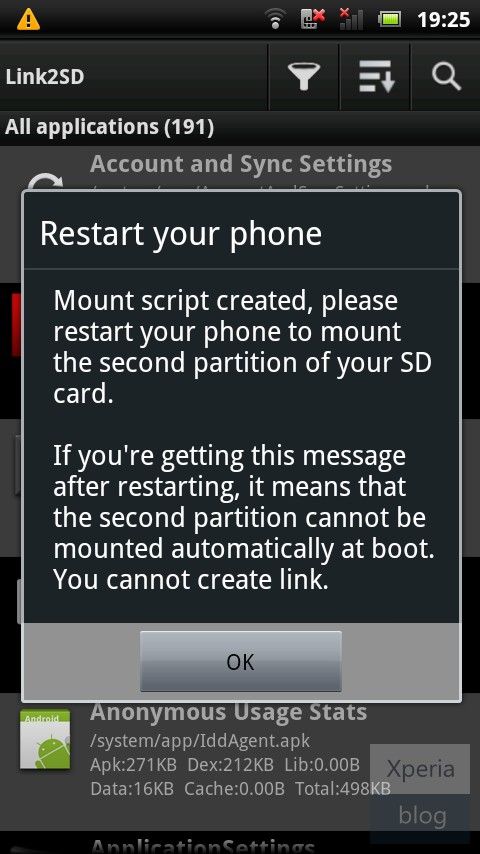
Once you see the following message, restart your phone. The app should now be ready to use.
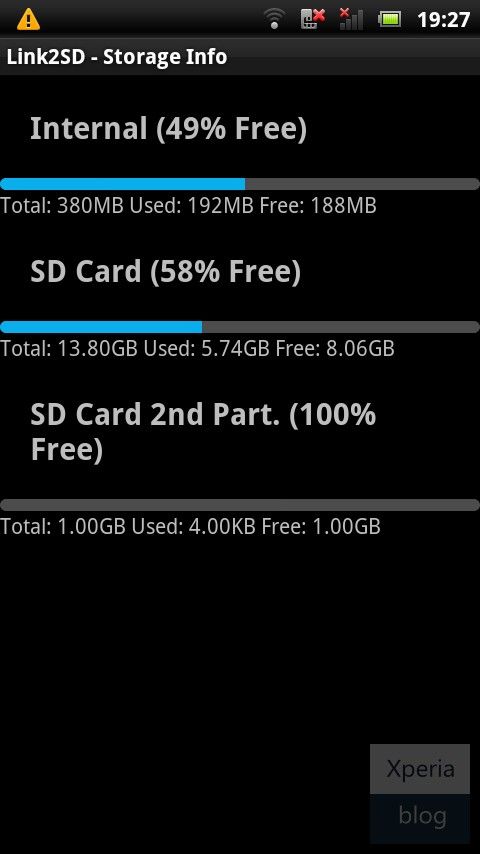
b) To make sure everything is installed correctly. Click the Menu button and go to ‘Storage Info’. This will show you the internal memory and your two partitions on the memory card. In our case, you can see that the second partition has 1GB free.
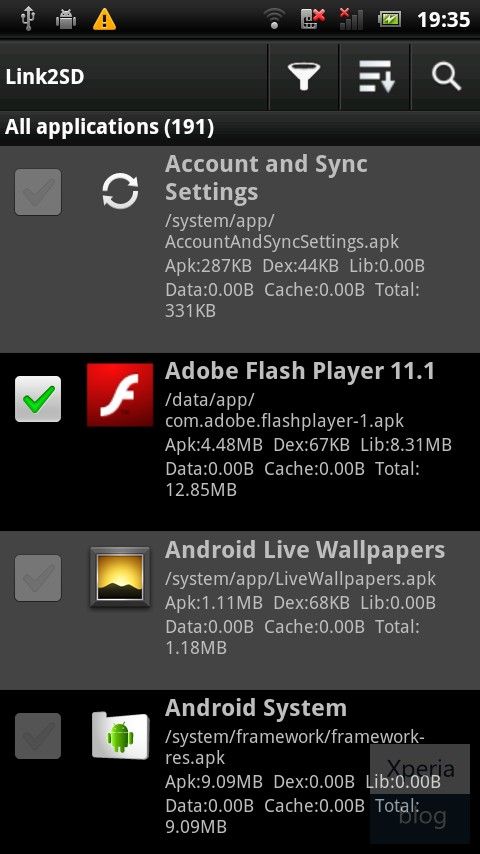
c) Now you need to move the apps of your choice to the memory card. Click the Menu button and press ‘Multi-select’.

Choose which apps you want to move by clicking the tick box next to the app. System apps are greyed out and cannot be selected. Link2SD can only move apps that are already on the internal memory. If you have apps already on your SD card, you will need to move them back to the internal memory before you can link them with Link2SD.
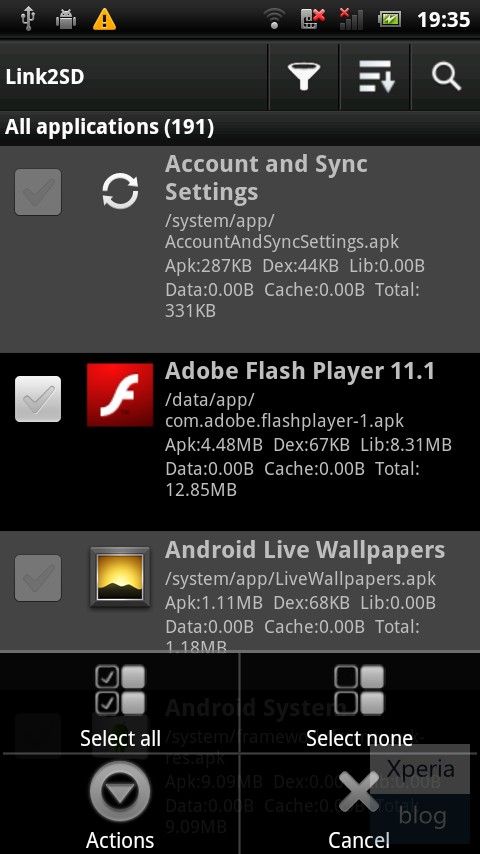
If you want to move all of your apps, pressing the menu button will bring up another menu allowing you to do this.
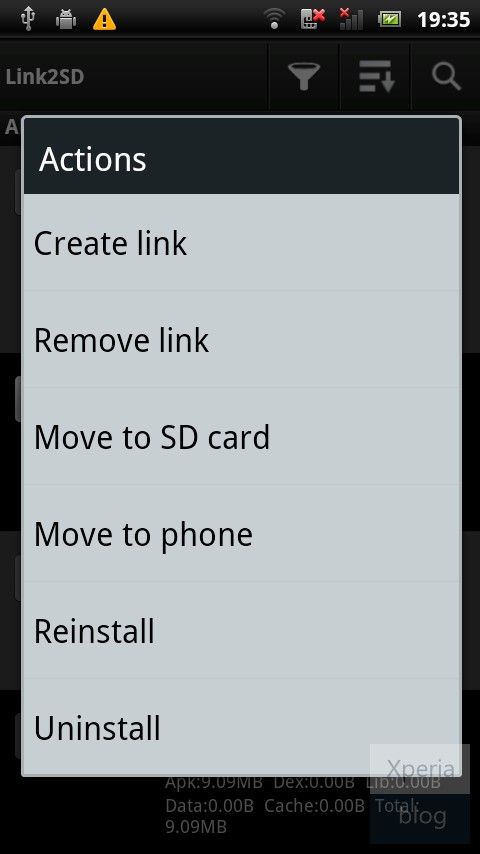
d) Once you have chosen which apps you want to move, you then need to hit the menu button and press ‘Actions’, which will bring up the following menu. Press ‘Create Link’.
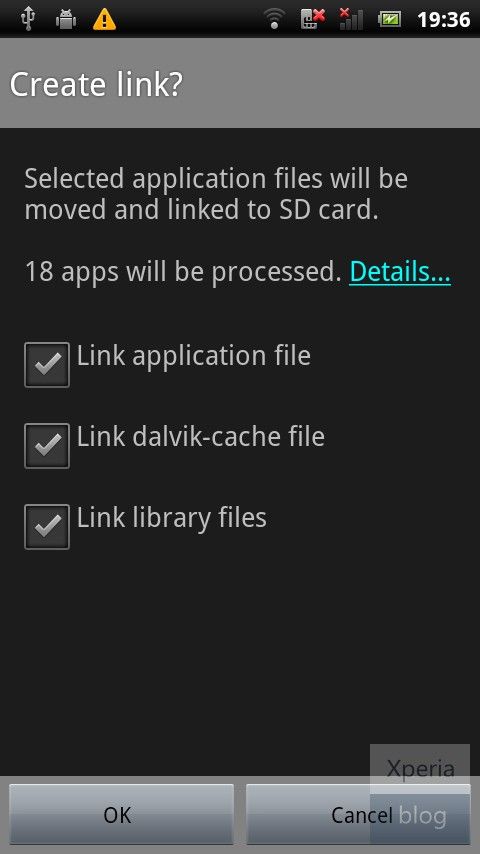
Leave all three check boxes ticked and press OK. Link2SD will now do its work and move/link the selected apps to your memory card.
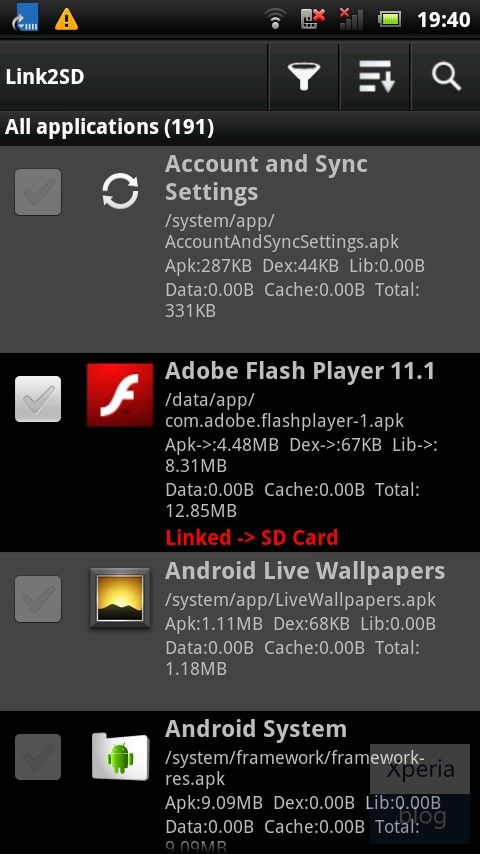
Once finished, you should see that the apps you have moved have ‘Linked -> SD Card’ in red font in the Link2SD app list. Reboot your phone.
e) Congratulations your phone is now using Link2SD! You should now go to Settings by pressing the menu button and configure how you would like Link2SD to work. The main decision here is whether you want to Auto Link newly installed apps to the memory card. Given that you’ve gone through the hassle of installing Link2SD we suggest you enable Auto Link and make worrying about your internal memory a thing of the past.

To get round this problem, we’ve written the following guide on Link2SD. In layman terms, Link2SD uses a secondary partition on your SD card and uses it as another segment of internal memory. Link2SD moves and links apk files, dalvik-cache (.dex) files and lib files onto this partition, which the OS mounts on boot. The great thing is that these linked apps remain available when your phone is connected in mass storage mode as Android only unmounts the first partition. Also, you don’t need to worry about linking something you weren’t meant to as Link2SD doesn’t allow you to link certain system applications.
Link2SD allows you to cherry-pick which apps/games to move to the SD card, you can auto-link new installs and the whole thing is wrapped in a user-friendly user interface. We’ve been using Link2SD for a while now and it’s a godsend, especially for the Xperia PLAY where we tend to download a lot of games. If you’re constantly managing your internal memory we highly recommend you give Link2SD a try, see the full guide below.
Guide to using Link2SD on your Xperia smartphone / LG OPTIMUS ONE P500 / LG OPTIMUS ME P350
This guide may seem lengthy, but trust us when we say it is straightforward. All steps have been documented which makes it look daunting. Read each section carefully and follow the steps outlined to install Link2SD.1. PREPARATION
Please make sure you have completed all of the following before starting the tutorial.
On your PC:
– Install the necessary drivers for your Xperia smartphone onto your PC/laptop. The easiest way to do this is to ensure that Sony Ericsson PC Companion is installed on your PC. Once installed, connect your phone to complete the process.
– Download and install MiniTool Partition Wizard onto your PC or laptop.
On your Xperia:
– Enable USB de-bugging mode: Setting –> Applications –> Development –> Tick ‘USB debugging’
– Enable the ability to install unknown apps: Setting –> Applications –> Tick ‘Unknown sources’
– Install Link2SD from Android Market onto your Xperia smartphone. It is a free download.
2. ROOT
Rooting your handset gives you the permissions necessary to install custom software on your handset.
a) First, download the ‘Xperia 2011 Easy Rooting Toolkit’ from here.
b) Extract the RAR file using WinRAR or 7-Zip.
c) Connect your Xperia to your PC.
d) Click on ‘RUNME.bat’ from the extracted RAR file, which should give you the following screen. Just press any button to let the program do its work.
e) When finished you should see the output as per the picture below. The phone should now be rooted, make sure you restart your handset before the next step.
3. BACKUP MEMORY CARD
As we will be creating a partition on your microSD memory card, make sure you create a backup just in case anything goes wrong.
a) Create a new folder on your PC and name it anything you want, such as ‘SD_Backup’
b) Connect your phone to the PC, navigate to your memory card and copy the contents to the backup folder.
4. CREATE SECONDARY PARTITION
You now need to create a secondary partition on your microSD memory card that will enable you to use Link2SD.
Note: We will use MiniTool Partition Wizard to create a secondary partition on your microSD card. This partition can be ext2, ext3, ext4 or FAT32. We will use FAT32 as it is supported on all phones and should lead to less troubleshooting later. You can use any partition manager of your choosing, but the steps below guide you through MiniTool Partition Wizard.
There is no need to wipe your memory card when going through this process, just ensure you have at least 0.5GB to 1.0GB of free space to make it worthwhile. You also do not need to use a microSD card adaptor as the process below creates the partition whilst the phone is connected to your PC.
a) Connect your handset to the PC via USB and then launch MiniTool. You should see the details pop up under ‘Disk 2′.
b) Click on the memory card under Disk 2 in MiniTool and then in the left pane, press ‘Move/Resize Partition’. On the blue bar under ‘Size and Location’, move the right arrow towards the left to create the size of the secondary partition desired. In the example below we created a secondary partition with 1018.63MB of space. This value can also be typed in manually in ‘Unallocate Space After’.
c) Once this is done you should see that your memory card is now split into two partitions under Disk 2 of MiniTool. Right click this new partition and then press ‘Create’.
If you see this pop-up below, just press ‘Yes’ to continue.
d) You should then see this ‘Create New Partition’ window. Under ‘Create As’ click Primary and then under ‘File System’ click FAT32. Leave the cluster size as default and you can assign whichever drive letter you want. Once finished press OK.
e) This should bring you back to the main MiniTool screen. Now hit the ‘Apply’ button on the top-left of the screen, denoted by a tick symbol.
This will bring up another pop-up window and will take several minutes to both resize and create the secondary partition.
If successful, you should see message below. Congratulations your card is ready to use in conjunction with Link2SD. Restart your handset before moving to the next step.
5. LINK2SD
This application makes it easy for users with root privileges on their phone to move applications to the SD card.
a) Open the Link2SD app on your phone. You should be greeted with the following menu, check the FAT32 option and click OK.
You will then see the Superuser Request, click ‘Allow’.
Once you see the following message, restart your phone. The app should now be ready to use.
b) To make sure everything is installed correctly. Click the Menu button and go to ‘Storage Info’. This will show you the internal memory and your two partitions on the memory card. In our case, you can see that the second partition has 1GB free.
c) Now you need to move the apps of your choice to the memory card. Click the Menu button and press ‘Multi-select’.
Choose which apps you want to move by clicking the tick box next to the app. System apps are greyed out and cannot be selected. Link2SD can only move apps that are already on the internal memory. If you have apps already on your SD card, you will need to move them back to the internal memory before you can link them with Link2SD.
If you want to move all of your apps, pressing the menu button will bring up another menu allowing you to do this.
d) Once you have chosen which apps you want to move, you then need to hit the menu button and press ‘Actions’, which will bring up the following menu. Press ‘Create Link’.
Leave all three check boxes ticked and press OK. Link2SD will now do its work and move/link the selected apps to your memory card.
Once finished, you should see that the apps you have moved have ‘Linked -> SD Card’ in red font in the Link2SD app list. Reboot your phone.
e) Congratulations your phone is now using Link2SD! You should now go to Settings by pressing the menu button and configure how you would like Link2SD to work. The main decision here is whether you want to Auto Link newly installed apps to the memory card. Given that you’ve gone through the hassle of installing Link2SD we suggest you enable Auto Link and make worrying about your internal memory a thing of the past.
What Is ClockworkMod Recovery And How To Use It On Android [Complete Guide]
ClockworkMod – also known as Clockwork and CWM – is a custom recovery for Android phones and tablets that allows you to perform several advanced recovery, restoration, installation and maintenance operations on your Android device that aren’t possible with the stock recovery. In what follows, we will cover all that this recovery is capable of doing, and how to do it.
Here is what we shall be covering in this guide:
1. About Android recovery
2. Introduction to ClockworkMod
3. Installing ClockworkMod
4. Booting into ClockworkMod
5. Feature tour
6. Using ClockworkMod for ROM, kernel, apps, theme or mod installation.
Now let’s take a look at each of these topics in detail.
About Android Recovery
All Android devices ship with a recovery console that is basically a partition on the device’s internal memory and can be booted into. The stock recovery of almost all Android devices provides a few basic yet handy options that allow you to factory reset your device and also to recover its operating system using an official ROM in zip format, but that’s all you can do with it. That’s where a custom recovery comes handy.
A custom Android recovery basically replaces the stock recovery with one that lets you do all you can do with the stock recovery, plus a plethora of more options to give you a lot more control on your device. With a custom recovery, you can install official and unofficial ROMs as well as other updates including apps, themes, kernels etc. using zip files, wipe not just user data but pretty much every partition on your device, mount the storage card for USB mass storage access without leaving recovery, partition your SD card, wipe Dalvik cache and battery stats, fix permissions, perform, manage and restore backups and so on.
Introduction to ClockworkMod
ClockworkMod recovery is one of the most widely used custom Android recoveries that is available for most mainstream Android devices. It is our custom recovery of choice here at AddictiveTips and almost every custom ROM that we install on our devices is done using this recovery.
ClockworkMod recovery has been developed by Koushik Dutta (also known as Koush) – the same guy who brought us the Android ROM Manager. He can be found at his blog hacking away at Android devices and at Twitter.
Installing ClockworkMod
What sets ClockworkMod recovery apart from most other custom Android recoveries is its dead simple installation process on most devices. It does require you to fully root your device in order to be installed but once rooted, installing it is as simple as installing ROM Manager from Market, launching it and using its first option i.e. the one that says ‘Flash ClockworkMod recovery’. We have this method covered in detail in our guide on how to install ClockworkMod recovery to your Android device. However, in certain cases, this ROM Manager method will not work. The following scenarios will require alternative installation methods:
Your device doesn’t have an official version of ClockworkMod recovery released yet but you have found a custom version built by someone else using the ClockworkMod recovery source code.
Your device does have an official version of ClockworkMod recovery released but there is either a yet-unreleased official version or an unofficial version that you want or need to install instead.
Your device has some added protection enabled by the manufacturer preventing the automatic ROM Manager method for installing the recovery, as with some Samsung Galaxy S series devices.
Your device isn’t a native Android device but Android has been ported to run on it and it therefore requires a specialized method for installing ClockworkMod recovery, as with the HTC HD2.
We have most of these scenarios already covered and you can use the following guides to install ClockworkMod recovery if the automatic ROM Manager method fails for you. Multiple devices:
How to install any Android recovery on any Android device using fastboot or flash_image.
How to install any version of ClockworkMod recovery using ROM Manager with a trick.
Our ClockworkMod recovery section for guides on several other devices including most tablets.
Specific devices:
How to install ClockworkMod recovery on Samsung Galaxy S I9000.
How to install ClockworkMod recovery on Samsung Continuum.
How to install ClockworkMod recovery on HTC HD2 with MAGLDR.
Booting into ClockworkMod
Once you have ClockworkMod recovery installed on your Android device, booting into it is quite simple. All you have to do is launch ROM Manager and tap ‘Reboot into Recovery’. Also, if you have ADB installed on your computer, you can simply enable USB debugging mode on your device from Settings > Applications > Development, connect it to your computer via USB, launch a Command Prompt / Terminal window on your computer and enter this command: adb reboot recovery The above methods will not work in certain cases though, for instance if you can’t boot into Android in the first place due to some issue, or if you are using a device like the HTC HD2 that doesn’t natively support an Android recovery. Many solutions are available in these cases.
Using hardware button combination on most Android devices: On most Android devices including ones by HTC, you can enter recovery by powering your device off and then powering it back on while keeping either the ‘Volume Down’ or the ‘Volume-Up’ button pressed, depending on the device. This will enter the bootloader from where you can select the ‘RECOVERY’ option by navigating to it with the Volume key and entering it with the ‘Power’ key. On most Samsung devices specifically Samsung Galaxy S series devices, you must keep both the ‘Volume-Up’ and ‘Home’ keys pressed while powering on the device, to directly enter recovery.
Using MAGLDR on HTC HD2: Entering ClockworkMod recovery on the HTC HD2 can’t be done via ROM Manager or any hardware button combination but that doesn’t mean it is difficult in any way. All you have to do is power the device off, power it on by keeping the Power key pressed till you see the MAGLDR bootloader’s menu and finally selecting the ‘AD Recovery’ option.
Feature Tour
Now that you have ClockworkMod recovery up and running on your phone or tablet, let’s take a look at all the options it offers you to manage your Android device. We are using a Nexus S running ClockworkMod recovery 3.0.0.5 but the details should apply to other devices and other
3+ versions of the recovery as well, while versions prior to 3 will have some very minor changes that shouldn’t be an issue. This is what you see when you reboot your device into ClockworkMod recovery:
You can navigate these options by using the Volume-Up and Volume-Down keys to highlight an option and the ‘Power’ key to enter/launch the highlighted option on most Android devices. On devices equipped with a trackball or an optical track pad such as G1, G2, Nexus One, HTC Desire etc., the trackball or track pad can be used for navigation and clicking it can be used to enter/launch the selected option. Let’s review each of these options and their sub-menu options in detail.
1. reboot system now This one is self-explanatory.
2. apply update from sdcard This can be used for installation of any official or unofficial update, ROM, kernel, theme etc. that is in a zip format installable from recovery, as long as the file is named update.zip and it has been placed on the root of your SD card (i.e. not in any sub-folder). Selecting this option (and most of the options featured below) will bring up a rather annoying confirmation prompt but this has saved us on multiple occasions from a lot of trouble we would have been into due to accidental key presses. This is what we are talking
about:
3. wipe data/factory reset This option wipes all user data on the device as well as cache. Doing this will leave your phone in the state it was in when you bought it or when any custom ROM was first
installed. It will also wipe any sd-ext partition that you might have setup (more on this later).
4. wipe cache partition Wipes the cache partition of the device to clear all the data accumulated there over use. This is often used before installing a new ROM, app, kernel or any similar mod via recovery.
5. install zip from sdcard This option brings up the following sub-menu:
A. apply /sdcard/update.zip This one is essentially the same as the ‘apply update from sdcard’ option of the main menu.
B. choose zip from sdcard Lets you install any zip file (with any name) from any location on your SD card. The file can be for a ROM, a kernel, an application, a theme or any mod as long as it is in recovery-flashable zip format. This is the most widely used option for installing a ROM that you have downloaded and copied to your SD card. Entering this option will bring up a screen that will allow you to browse your SD card for the zip file and
select it for installation as in this screenshot:
C. toggle signature verification Turns the signature verification on and off. When signature verification is on, you will not be able to install any custom ROMs that haven’t been signed by the developers
(most custom ROMs aren’t signed). Switching it off skips the signature verification check and proceeds with the installation.
D. toggle script asserts Seldom-used option for a vast majority of users. It simply turns script asserts on or off. If you don’t know about these (we don’t), it’s best not to change this option.
E. +++++Go Back+++++ Takes you back to the main recovery menu, obviously!
6. backup and restore Undoubtedly one of the most important features provided by a custom recovery, the backup and restore feature – also known as Nandroid backup – allows you to take a snapshot of your phone’s entire internal memory including all
partitions, and save it on the SD card. Here is how it looks:
A. Backup Takes a Nandroid backup, as explained above.
B. Restore Lets you restore a previously taken backup. Entering this option presents you with a list of existing backups from the SD card that you can choose from for restoration.
C. Advanced Restore This option is similar to the Restore option but once a backup has been selected to be restored, this option allows you to choose what parts of it to restore. You can choose to restore the boot, system, data, cache and sd-ext partitions, as shown
here:
7. mounts and storage Allows you to perform maintenance tasks on all the internal and external partitions of your
android device
A. mount/unmount /system, /data, /cache, /sdcard or /sd-ext These options let you toggle between mounting or unmounting these respective partitions. Most users don’t need to change these options.
B. format boot, system, data, cache, sdcard or sd-ext These let you directly format any of these partitions. Take extreme care with this option as formatting any of these partitions will result in losing all data on them, especially the boot and system partitions. Formatting the system partition will remove your ROM and leave your phone without an operating system while wiping the boot partition may brick your phone unless you restore or flash another one before rebooting your device. To learn more about the contents of all these partitions, see our guide to Android partitions.
C. mount USB storage Lets you enable USB mass storage mode for your SD card right from recovery so that you can connect it to your computer via USB and transfer any files to/from it without having to leave recovery.
8. advanced This section contains a few options most users will not require, though these can come handy quite often, especially wiping Dalvik cache, which is required before most ROM
installations. Here are the options from this section:
A. Reboot Recovery Lets you directly and very conveniently reboot from recovery right back into recovery. This is useful option for certain back-to-back installations that require the device to at least boot once between them.
B. Wipe Dalvik Cache Allows you to wipe the cache for the Dalvik virtual machine (the custom-built Java virtual machine for Android).This is required before most ROM installations and at other occasions too, for fixing some problems.
C. Wipe Battery Stats Wipes the saved battery usage statistics and effectively recalibrates the battery. Useful in various scenarios when Android isn’t showing correct battery levels.
D. Report Error In case of errors, this feature can be used to save a log of recent ClockworkMod recovery operations on the SD card that you can later report from Android using ROM Manager.
E. Key Test Lets you press any of the hardware keys to see if they are properly functioning, and to see their key codes.
F. Partition SD Card This option gives you a no-frills way to partition your SD card properly for use with ROMs that support data2ext (a very handy hack for low internal memory devices that enables an /sd-ext partition on the SD card to be used as the internal user data storage i.e. as the /data partition). Once this option is selected, you will be given options to choose the sizes for the /sd-ext partition as well as an optional /swap partition on the SD card, and will then automatically format it for you, leaving the remaining space for normal SD card usage. This option will wipe all data from your SD card so use it with caution!
G. Fix Permissions Fixes the file permissions for the internal memory partitions back to default. This is very useful as a fix for several errors and Force-Closes that start appearing after you or an application you installed and provided root access end up messing up the permissions of important files.
Using ClockworkMod for ROM, kernel, apps, theme or mod installation
While in the complete feature tour we have already shown you how to install a ROM, kernel, app, theme or any similar mod from a recovery-flashable zip file using the recovery options, those of you who jumped straight to this section expecting to get just this information quickly are at the right place!
This guide is primary focused on a full feature tour of ClockworkMod recovery but in our previously written guide on how to flash a ROM or app from a zip to an Android device file from recovery, we have already covered in detail how to use ClockworkMod for installing any ROM, kernel, app, theme or mod using a recovery-flashable zip file. While that guide is based on an older version of ClockworkMod recovery, everything in it still applies t
Thanks and it worked like magic on LG optimus P500.
ReplyDeleteIt is showing "Root access warning"
ReplyDeletelink2SD could not obtain root access
what should i do???
Sorry for late response............
ReplyDeleteIS YOUR PHONE IS ROOTED ?
You can check it by ---if ur phone is rooted a app icon of SUPERUSER is shown in your application.. and also by running RootChecker.apk
which you can get from here......http://www.apkfullapps.com/2012/05/root-checker-pro-v127-apk-app.html
It worked on my Samsung P500 : )
ReplyDeleteThanks for this tutorial. I have a quuestion, when i select a system application such as google maps or LG Home (my phone is LG p500) there is no availabele the action create link, is this correct or i make somthing wrong?
ReplyDeleteSystem applications can't be linked.........but updated applications such as... google maps, youtube, gmail, etc can be linked but not LG home............remember only updated applications can be linked..........
Delete